Report on Inter/Intra Internship
VISVESVARAYA technological university
gnanaSangama, Belagavi -590018

REPORT ON
INTRA INSTITUTIONAL INTERNSHIP (21INT49)
|
Submitted By:
NAME: Balam Indira Priyadarsini
USN:1SJ21IS010
Under the guidance of
Associate Professor
Department of Information science and Engineering

S.J.C INSTITUTE OF TECHNOLOGY
Department of Information science and Engineering
Chickballapur – 562101
Introduction to Microsoft
Office Software
Microsoft Office is a set of computer
applications mainly used for business or office purposes. First introduced in
1990, Microsoft Office
software is made by the Microsoft Corporation.

MS Office helps simplify basic office
tasks and improve work productivity. Each application is designed to address
specific tasks, such as word processing, data management, making presentations
and organizing emails.
Microsoft has developed multiple versions of
Office that can be supported by different operating systems, including Windows,
Linux, and macOS.Microsoft Office is also offered in 35 different languages.
Microsoft Office Common Applications
The most common Office applications are Word,
Excel, PowerPoint, and Outlook. Other apps include Publisher, Access and
OneNote.
Here’s a brief explanation of each of the
different apps and what you can use them for:
·
Microsoft Word: is a word processor that lets users
make and edit text documents, such as reports, letters, and résumés and run
spell-checks on writing
·
Microsoft Excel: is
an electronic spreadsheet program that helps you store, organize and manipulate
data by creating simple to complex spreadsheets
·
Microsoft
PowerPoint:
allows you to visually display information, using anything from basic
slideshows to professional multimedia presentations
·
Microsoft
Outlook: is a personal information manager mainly
used for emails, but that can also be used to store calendars and contact
information, manage tasks as well as organize meetings
·
Microsoft
Publisher:
is a graphic design app that gives users creating material for marketing or
publications more options in the layout and design of their documents
·
Microsoft Access: is
a database management system that allows you to link and use data from other
sources, manipulate the data you’ve gathered in different ways, as well as
create simple business applications
·
Microsoft
OneNote: is a digital alternative to a paper
notebook that allows you to create, organize and share your notes easily
Microsoft Office is either available as a
package or you can buy stand-alone Microsoft Office applications, such as Word
or Excel, separately.
Most basic packages come with Word, Excel,
PowerPoint, and Outlook, while some also include other Microsoft Office
programs, such as Publisher, Access, and/or OneNote.
Make sure to check with your supplier when
making a purchase in which programs are included in your deal.
If you’re looking for a software company you
can trust for its integrity and honest business practices, look no further than
SoftwareKeep. We will be with you before, during, and after all the sales.
That’s our 360 Degree SoftwareKeep Guarantee.
Introduction to Microsoft Word :
Microsoft word is a word processor software developed by Microsoft in 1983.
It is the most
commonly used word processor software. It is used to create professional
quality documents, letters, reports, resumes, etc and also allows you to edit
or modify your new or existing document. The file saved in Ms Word has .docx
extension. It is a component of the Microsoft Office suite, but you can buy it
separately and is available for both Windows and macOS. The latest version of
Ms Word is 2019. In this article we will learn the features of Ms Word, but first
we learn how to open Ms Word?

How to open MS Word?
The following step shows how to open MS words:
Step 1: Type Ms Word in the search bar.
Step 2: Select Ms Word application.
Step 3: Select a blank document and press create button.
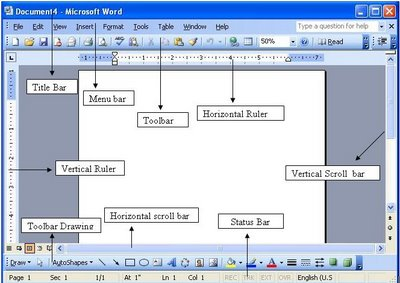
Then you will get a window like in the image below where you can write your
content and perform different types of operations on that content, like font
type, style, bold, italic, etc. You can also add images, tables, charts to your
document.
Features of MS Word
Now let us discuss the features or components of the Ms Word. Using these
features, you can perform different types of operations on your documents, like
you can create, delete, style, modify, or view the content of your
document.
1. File
It contains options related to the file, like New(used to create a new document), Open(used to open an existing document), Save(used to save document), Save As(used to save documents), History, Print, Share, Export, Info, etc.
2. Home
It is the default tab of Ms Word and it is generally divided into five groups, i.e., Clipboard, Font, Paragraph, Style and Editing. It allows you to select the color, font, emphasis, bullets, position of your text. It also contains options like cut, copy, and paste. After selecting the home tab you will get below options:
3. Insert
It is the second tab present on the menu bar or ribbon. It contains various items that you may want to insert into a Microsoft word. It includes options like tables, word art, hyperlinks, symbols, charts, signature line, date and time, shapes, header, footer, text boxes, links, boxes, equations, etc., as shown in the below image:
4. Draw
It is the third tab present in the menu bar or ribbon. It is used for freehand drawing in Ms Word. It provides different types of pens for drawing as shown below:
5. Design
It is the fourth tab present in the menu bar or ribbon. The design tab contains document designs that you can select, such as documents with centered titles, offset headings, left-justified text, page borders, watermarks, page color, etc., as shown in the below image:
6. Layout
It is the fifth tab present on the menu bar or ribbon. It holds all the options that allow you to arrange your Microsoft Word document pages just the way you want them. It includes options like set margins, display line numbers, set paragraph indentation, and lines apply themes, control page orientation and size, line breaks, etc., as shown in the below image:
7. References
It is the sixth tab present in the menu bar or ribbon. The references tab lets you add references to a document, then create a bibliography at the end of the text. The references are generally stored in a master list, which is used to add references to further documents. It includes options like, Table of Contents, Footnotes, Citations & Bibliography, Captions, Index, Table of Authorities, smart look, etc. After selecting References tab, you will get the below options:
8. Mailings
It is the seventh tab present in the menu bar or ribbon. It is a least used tab in the menu bar. This tab is where you would create labels, print them on envelopes, do mail merge, etc. After selecting mailing, you will get the below options:

9. Review
It is the eighth tab present in the menu bar or ribbon. The review tab contains, commenting, language, translation, spell check, word count tools. It is good for quickly locating and editing comments. After selecting a review tab, you will get the options below:

10. View
It is the ninth tab present in the menu bar or ribbon. View tab allows you
to switch between single page or double page and also allows you to control the
layout tools It includes print layout, outline, web layout, task pane,
toolbars, ruler, header and footer, footnotes, full-screen view, zoom, etc. as
shown in the below image:
Introduction
to MS-Excel
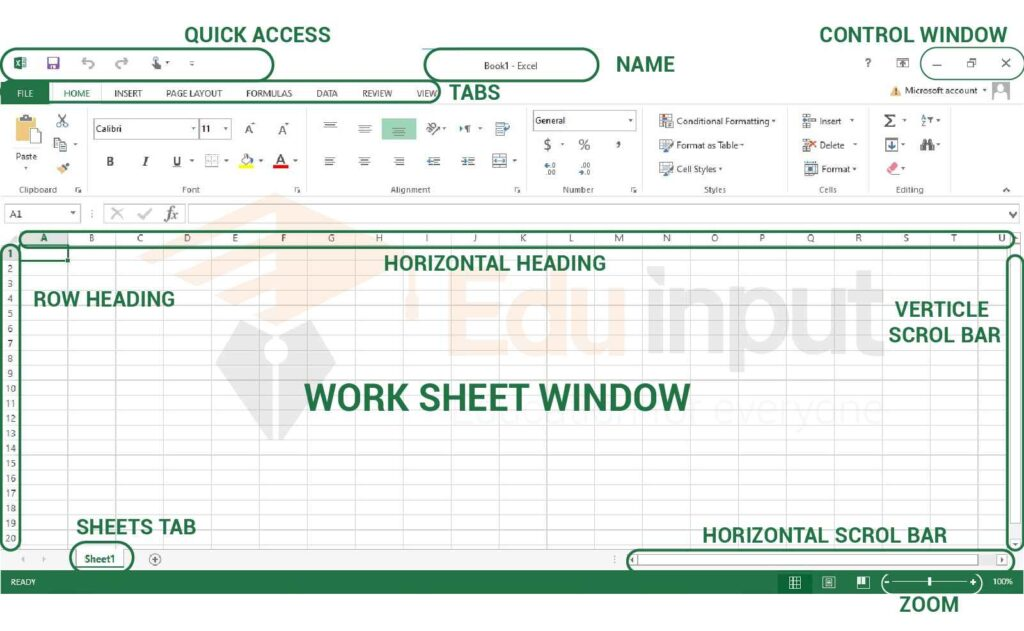
MS-EXCEL is a part of Microsoft Office suite
software. It is an electronic spreadsheet with numerous rows and columns, used
for organizing data, graphically represent data(s), and performing different
calculations. It consists of 1048576 rows and 16384 columns, a row and
column together make a cell. Each cell has an address defined by column name
and row number example A1, D2, etc. this is also known as a cell reference.

Cell references: The address or name of a cell
or a range of cells is known as Cell reference. It helps the software to
identify the cell from where the data/value is to be used in the formula. We
can reference the cell of other worksheets and also of other programs.
- Referencing
the cell of other worksheets is known as External referencing.
- Referencing
the cell of other programs is known as Remote referencing.
There are three types of cell references in Excel:
- Relative
reference.
- Absolute
reference.
- Mixed reference.
The Ribbon in MS-Excel is the topmost row of tabs that provide the user with different facilities/functionalities. These tabs are:
- Home Tab: It provides the basic
facilities like changing the font, size of text, editing the cells in the
spreadsheet, autosum, etc.
- Insert Tab: It provides
the facilities like inserting tables, pivot tables, images, clip art,
charts, links, etc.
- Page layout:
It provides all the facilities related to the spreadsheet-like margins,
orientation, height, width, background etc. The worksheet appearance will
be the same in the hard copy as well.
- Formulas: It is a package of different
in-built formulas/functions which can be used by user just by selecting
the cell or range of cells for values.
- Data: The Data Tab helps to perform different
operations on a vast set of data like analysis through what-if analysis
tools and many other data analysis tools, removing duplicate data,
transpose the row and column, etc. It also helps to access data(s) from
different sources as well, such as from Ms-Access, from web, etc.
- Review: This tab provides the
facility of thesaurus, checking spellings, translating the text, and helps
to protect and share the worksheet and workbook.
- View: It contains the commands to manage
the view of the workbook, show/hide ruler, gridlines, etc, freezing panes,
and adding macros.
Creating a new spreadsheet:
In Excel 3 sheets are already opened by default, now to add a new sheet :
- In the
lowermost pane in Excel, you can find a button.
- Click on that button to add a new sheet.
- We can also
achieve the same by Right-clicking on the sheet number before which you
want to insert the sheet.
- Click on Insert.
- Select
Worksheet.
- Click OK.
Opening previous spreadsheet:
On the lowermost pane in Excel, you can find the name of the current sheet
you have opened.
On the left side of this sheet, the name of previous sheets are also
available like Sheet 2, Sheet 3 will be available at the left of sheet4, click
on the number/name of the sheet you want to open and the sheet will open in the
same workbook.
For example, we are on Sheet 4, and we want to open Sheet 2 then simply just click on Sheet2 to open it.
Managing the spreadsheets:
You can easily manage the spreadsheets in Excel simply by :
- Simply navigating between the sheets.
- Right-clicking
on the sheet name or number on the pane.
- Choose among
the various options available like, move, copy, rename, add, delete etc.
- You can move/copy your sheet to other workbooks as well just by selecting the workbook in the To workbook and the sheet before you want to insert the sheet in Before sheet.
To save the workbook:
- Click on the
Office Button or the File tab.
- Click on Save
As option.
- Write the
desired name of your file.
- Click OK.
To share your workbook:
- Click on the
Review tab on the Ribbon.
- Click on the
share workbook (under Changes group).
- If you want
to protect your workbook and then make it available for another user then
click on Protect and Share Workbook option.
- Now check the
option “Allow changes by more than one user at the same time. This also
allows workbook merging” in the Share Workbook dialog box.
- Many other
options are also available in the Advanced like track, update changes.
- Click OK.
Ms-Excel shortcuts:
- Ctrl+N: To open a new workbook.
- Ctrl+O: To open a
saved workbook.
- Ctrl+S: To save a workbook.
- Ctrl+C: To copy the selected cells.
- Ctrl+V: To paste the copied cells.
- Ctrl+X: To cut the selected cells.
- Ctrl+W: To close the workbook.
- Delete: To remove all the contents
from the cell.
- Ctrl+P: To print the workbook.
- Ctrl+Z: To undo.
- Introduction to Microsoft PowerPoint
- Information can be displayed using an electronic presentation application. This information is usually presented as a slide show — the data is displayed on a slide that may be viewed on a computer monitor or projected onto a screen using an LCD projector. A presentation might consist of multiple slides that are exhibited one after the other. The presentation tool in MS Office is MS PowerPoint. Microsoft PowerPoint is a popular presentation application, although there are alternatives such as Corel Presentations OpenOffice.org, Impress, etc.
Three major components of a presentation program are:
(i) An editor that allows text to be input and formatted
(ii) a means for inserting visual pictures, audio, and video
(iii) and a slide-show system to display the final content.
How to open MS PowerPointIn Windows 8/above:
Step 1: Press Windows + c to open the search bar.
Step 2: Type PowerPoint & click on the MS Office version you are having in your system. MS Office window will pop up.
In Windows 7 or below:
Step 1: Go to the program section in the windows start menu.
Step 2: Go to MS Office & click on it. A drop-down list is seen
Step 3: Click on MS PowerPoint & MS PowerPoint window will pop up.Creating a Presentation
Once your MS PowerPoint Window pops up, you can create & save the file by:
Step 1: Click on the Microsoft button on the top left.
Step 2: Click on new, a new Presentation window will pop up.
Step 3: Click on Create & a new presentation will be created.
Note: Shortcut for New: Ctrl +n
Saving a Presentation
Once you have created a presentation, it can be easily saved with the help of following steps:
Step 1: Click on the Microsoft icon
Step 2: Click on the Save button.
Step 3: A new Window for Save As will pop up.
Step 4: Select the drive (by clicking on it: Example: Local Drive (D)) in which you want to save the presentation. Then your drive will open up, select the folder in which you want to save the presentation (Example: img folder here) & then give the required name to your presentation (Example: MyPresentation here). Your presentation is created & saved with the provided name.
Note: Shortcut for save: Ctrl + s
Basic Elements of a PowerPoint Window/Slide
You can see various bars in the presentation window. They are:
(i) Title Bar: This shows the name/title given by you to the current presentation. If user do not save the presentation by any name, default name given by MS PowerPoint appears in this bar.
(ii) Menu Bar: Contains menu items like insert, views, design, animations, etc.
(iii) Office Button: MS Office button on the left-most top.
(iv) Formatting Toolbar: Have tools like Bold, Italic, Underline, Font shape & size etc. to format your data.(v) Zoom Slider: To zoom in or zoom out your presentation.
(vi) Slide Sorter Pane: This allows us to choose which slides will be shown in which sequence during the slide show.
(vii) Notes Pane: This allows us to type notes that we may require later when preparing for the presentation, but they will not be displayed during the slide show.
(viii) View Buttons: Provides different views of your presentation like : normal, slide show & slide sorter.
(ix) Slide Pane: This is where we type, format, and otherwise design the slide.
Concept of Slide ShowsAfter preparing the presentation, it’s time for the slide show. Steps for slide show are:
Step 1. Click on the view Option on the top Menu Toolbar
Step 2. Click on the slide show option.Step 3. The slide show will start (Press Esc key (escape) to come out of slide show)
Note: Shortcut for the slide show is: F5
Sample Questions
Question 1. How to print a Presentation through an attached printer?
Answer:
Step 1: Click on the Microsoft icon
Step 2: Click On Print & a window for Print & Preview the document will pop up.Step 3: Click on Print. Then a window for Print will pop up
Step 4: Select the printer by which you want to take out print of the document.
Select the page range (Print of all or some or current page) & number of copies you want.
Step 5: Click on OK.
You will get print of your Presentation.Note: Shortcut for print is Ctrl + p.
1. Ctrl + N – Create a New presentation.
2. Ctrl + S – Save a presentation.
3. Alt + F4 – Close a presentation.
4. Ctrl + P – Print a presentation


Introduction C Programming Language
This language is a must for those working professionals as well as students who want to become established software engineers. Here are some of the key reasons why you must learn the C language for the domain of software development:
- This language helps users comprehend a computer’s internal architecture. It assists you in knowing how a computer would store information within and retrieve it.
- Learning other programming languages becomes easier after learning C, such as Python, Java, etc.
- A programmer who is well-versed with the C language gets opportunities to work on various open-source projects. For instance, some of the very popular projects (open-source) have been written using the C programming language, such as Python interpreter, Linux kernel, SQLite database, and many more.
- The C language came into existence for writing an OS known as the UNIX operating system.
- This language is the successor of the B language, which came into existence in the early 1970s.
- The ANSI (American National Standard Institute) formalized this language in 1988.
- The creators of this language have totally written the UNIX OS in C.
- As of today, the C language is the most popular and widely used programming language.
- Programmers have implemented a majority of the futuristic, avant-garde tools and software using the C language.
The main features of the C language include:
- General Purpose and Portable
- Low-level Memory Access
- Fast Speed
- Clean Syntax
- Example:
- #include <stdio.h>
10
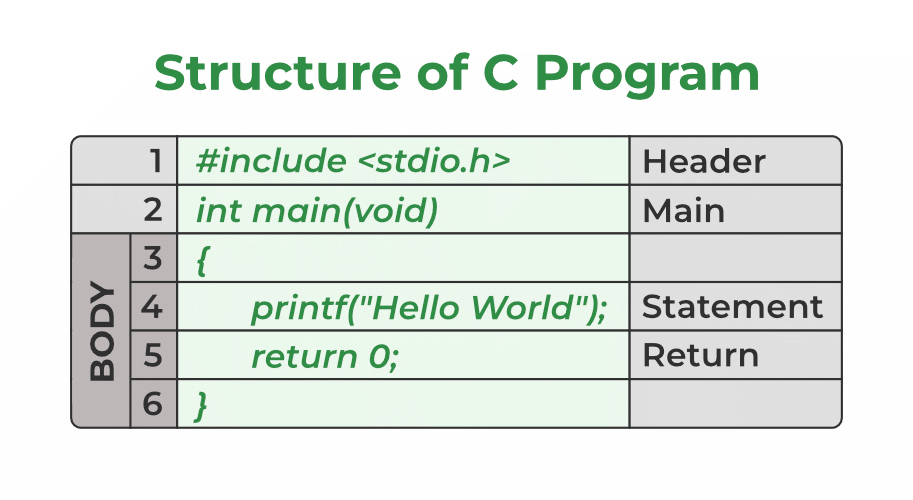
Structure of the C program
After the above discussion, we can formally assess the structure of a C program. By structure, it is meant that any program can be written in this structure only. Writing a C program in any other structure will hence lead to a Compilation Error. The structure of a C program is as follows:
1.UNKNOWN NKBMASS:
|
|
Output
UNKNOWN, NKBMASS!
One Dimensional Array
In computer science, Array is a type of Data structure
that is used to store elements of the same data type in continuous memory
locations. Arrays let us store multiple values of the same data type in a
single variable. Different types of arrays make it possible to store the values
in various structures. One of the most common structures of an Array in which the
values are stored is the One Dimensional Array Structure. We will learn more
about the concept of 1D Array in the article below
Definition
- A One-Dimensional
Array is the
simplest form of an Array in which the elements are stored linearly and
can be accessed individually by specifying the index value of each element
stored in the array.
- A One-Dimensional Array is a group of elements having the same data type
which are stored in a linear arrangement under a single variable name.
One Dimensional
Array
This is one of the simplest forms of Array. They are very easy to
define and use in the programs. The values stored in a One Dimensional Array
can be easily initialized and manipulated, making it a very feasible Data
structure type.
Declaration Syntax
data_type array_name[array_size];
where,
array_name = name of the 1D array
array_size = defines the number of
elements in the array
Initialization Syntax
To Initialize the 1D Array, we simply add a list to the right side
of the declaration syntax of the 1D Array. In simple terms, we assign values to
the declared 1D Array as per the array size specified.
data_type array_name[array_size]={comma_separated_element_list};
Note: The number of elements specified
in the list should not exceed the defined Array Size.
Example
int arr[10];// Declaring a 1D array of size 10
int roll_no[5]={1,2,3,4,5};// Initializing a 1D array of size 5
char names[30]={"Raj, John, Krish"};// Initializing a 1D array of type char
Browse more Topics
under Structured Data Type
Input Elements in
a 1D Array
There are few methods by which we
can assign and store values in an Array. Let us understand by looking at the 2
most common methods.
1.
Direct Initialization
In this method, the elements are
assigned during the declaration of the 1D Array.
Example
int num[10]={1,3,5,7,9,2,4,6,8,10};
2.
User Input Method
In this method, The user is asked
to enter the array elements of his/her choice during the run-time of the
program.
Example –
#include<iostream>
using namespace std;
intmain()
{int num[5];
cout<<"Enter array elements : \n";
for(int i=0;i<5;i++)
{
cin>>num[i];
}
} Output –
Enter array elements:
13579 Accessing 1D Array
Elements
We can either display the entire 1D Array to know what the elements are or
we can use the method of indexing in order to display only those Array values
which we require.
Note: Array Indexing always starts from 0.
Example 1
# To print a single element of an array
int arr[5]={1,3,5,7,9};
cout<<arr[3];// arr[3] i.e. index 3 of array will print the value 7
Example 2
# To print all the elements of an Array
int arr[5]={1,3,5,7,9};
cout<<"The array elements are: \n";
for(int i=0;i<5;i++)
{cout<<arr[i]<<" ";
} Output:
The array elements are:
13579
Manipulation
of 1D Array Elements
If we want to change a specific element stored in an array, we will use the
following method:
Example
#include<iostream>
using namespace std;
intmain()
{int arr[7]={10,20,30,40,55,60,70};
cout<<"5th value of Array Before updation : \n"<<arr[4];
arr[4]=50;
cout<<"\n 5th value of Array After updation : \n"<<arr[4];
}Output:
5th value of Array Before Updation:
555th value of Array After Updation:
50 2.
User Input Method
In this method, The user is asked
to enter the array elements of his/her choice during the run-time of the
program.
Example –
#include<iostream>
using namespace std;
intmain()
{int num[5];
cout<<"Enter array elements : \n";
for(int i=0;i<5;i++)
{
cin>>num[i];
}
} Output –
Enter array elements:
13579 Accessing 1D Array
Elements
We can either display the entire 1D Array to know what the elements are or
we can use the method of indexing in order to display only those Array values
which we require.
Note: Array Indexing always starts from 0.
Example 1
# To print a single element of an array
int arr[5]={1,3,5,7,9};
cout<<arr[3];// arr[3] i.e. index 3 of array will print the value 7
Example 2
# To print all the elements of an Array
int arr[5]={1,3,5,7,9};
cout<<"The array elements are: \n";
for(int i=0;i<5;i++)
{cout<<arr[i]<<" ";
} Output:
The array elements are:
13579
Manipulation of 1D Array Elements
If we want to change a specific element stored in an array, we will use the
following method:
Example
#include<iostream>
using namespace std;
intmain()
{int arr[7]={10,20,30,40,55,60,70};
cout<<"5th value of Array Before updation : \n"<<arr[4];
arr[4]=50;
cout<<"\n 5th value of Array After updation : \n"<<arr[4];
} Output
5th value of Array Before Updation:
555th value of Array After Updation:
50
Application of C
- Operating systems: C is widely used for developing operating systems such as Unix, Linux, and Windows.
- Embedded systems: C is a popular language for developing embedded systems such as microcontrollers, microprocessors, and other electronic devices.
- System software: C is used for developing system software such as device drivers, compilers, and assemblers.
- Networking: C is widely used for developing networking applications such as web servers, network protocols, and network drivers.
- Database systems: C is used for developing database systems such as Oracle, MySQL, and PostgreSQL.
- Gaming: C is often used for developing computer games due to its ability to handle low-level hardware interactions.
- Artificial Intelligence: C is used for developing artificial intelligence and machine learning applications such as neural networks and deep learning algorithms.
- Scientific applications: C is used for developing scientific applications such as simulation software and numerical analysis tools.
- Financial applications: C is used for developing financial applications such as stock market analysis and trading systems.
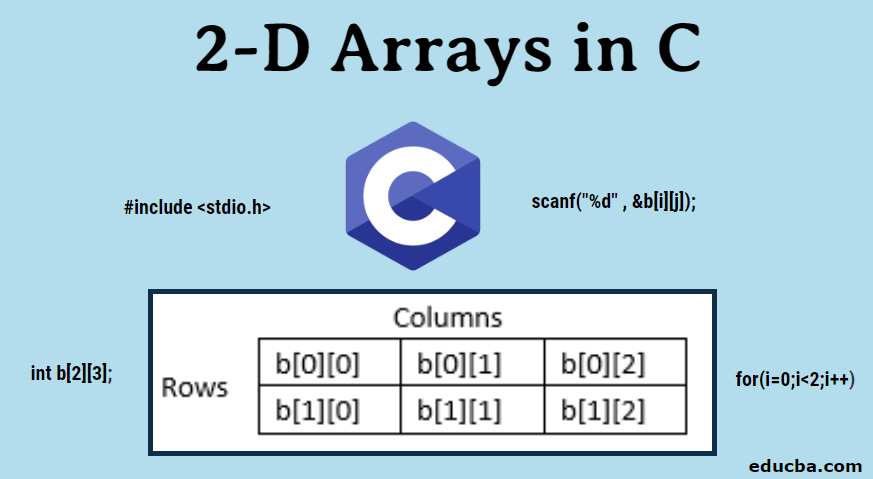
Passing 2-D Array to a Function
In this section, we are going to learn how to pass a 2D array to any function and access the corresponding elements. In the code below, we pass the array a, to two functions
show()andprint()which prints out the passed 2D array.#include<iostream>
using
std;q)[4],row,col){
i,j;i=0;i<row;i++)j=0;j<col;j++)cout<<"\t"<<*(*(q+i)+j);cout<<"\n";cout<<"\n";}
void
q[][4],row,col){
i,j;i=0;i<row;i++)j=0;j<col;j++)cout<<"\t"<<q[i][j];cout<<"\n";cout<<"\n";}int
{
a[3][4]a,a,}Output:
Here,
- In the
show( )function we have defined q to be a pointer to an array of 4 integers through the declarationint (*q)[4], - q holds the base address of the zeroth 1-D
array
- This
address is then assigned to q,
an int pointer, and then using this pointer all elements of the zeroth 1D
array are accessed.
- Next
time through the loop when
itakes a value 1, the expression q+i fetches the address of the first 1-D array. This is because q is a pointer to the zeroth 1-D array and adding 1 to it would give us the address of the next 1-D array. This address is once again assigned to q and using it all elements of the next 1-D array are accessed - In the
second function
print(), the declaration of q looks like this:int q[][4], - This is
same as int (*q )[4], where q is a
pointer to an array of 4 integers. The only advantage is that we can now
use the more familiar expression
q[i][j]to access array elements. We could have used the same expression inshow()as well but for better understanding of the use of pointers, we use pointers to access each element.
Example
1. program to determine whether the student is pass or fail
#include <iostream>
using namespace std;
}
if(marks<50 )
{
cout<<"bad show "<<endl;
if(marks<50 && (marks >=33))
{
cout<<"you can resit "<<endl;
}
else if(marks<33)
{
cout<<"redo please"<<endl;
}
}
int main()
{
int marks;
cout<<"enter marks "<<endl;
cin>>marks;
if(marks>=85)
{
cout<<"outstanding work "<<endl;
}
if(marks>=75 && marks<85)
{
cout<<"exellent work "<<endl;
}
if(marks>=65 && marks<75)
{
cout<<"average show "<<endl;
}
if(marks<=65 && marks>50)
{
cout<<"just/........ "<<endl;
2. Write a C Program to check whether a Person is eligible to Vote or not
#include
  <stdio.h>
int main()
{
int age;
printf("Enter age : ");
if (age >= 18)
printf("You can Vote!");
else
printf("You cant Vote!");
return 0;
}
OUTPUT
Program Output : Run 1
Enter age : 20
You can Vote!Program Output : Run 2
Enter age : 18
You can Vote!Program Output : Run 3
Enter age : 17
You can't Vote!Uses of the C Programming Language
- Procedural Language: The execution of the instructions present in a C program happens step by step.
- Speed: The C language is much faster as compared to a majority of the programming languages, such as Python, Java, and many more.
- Portable: A C program can be moved from any given platform to another one, and we can also run it on that platform without any of the charges.
- General Purposes: We can use the C programming language for developing operating systems, databases, embedded systems, etc.
Conclusion
know how to use the Microsoft word, excel, and powerpoint and I know the functions in
all those software to teach efficiently and effectively.· Arrays in C are derived data types containing similar data-type elements.
- In one-dimensional arrays in
C, indexing starts from 0 and ends at size-1, and if we try to access an element
out of range, it will return garbage value.
- We must include a data type,
variable name for array, and array size in square brackets while declaring
one-dimensional arrays in C.
- One-dimensional arrays in C
can be initialized statically (during compile-time) or dynamically (during
runtime).
- All the elements of an array
are stored at contiguous memory locations, and therefore, we can access
them using their unique index number.
So, in this article, we discussed two-dimensional arrays in C, how we can perform various operations as well as its application in matrix addition. For any further questions feel free to use the comments.
- In the


Comments
Post a Comment